Here is the complete graph for House of Hell.
Tl;dr: The idea here is to use directed graphs to provide optimal walkthroughs of Fighting Fantasy gamebooks; in this case, House of Hell. Check out the beginning of the Deathtrap Dungeon post for tips on how to read the graph.
Overall Impressions
I'm working through the books I had when I was a kid. House of Hell was one of those, though it was titled House of Hades here in the religiously-oversensitive United States. My copy even has some of my old marginalia, like "Turn to 88 for the meaning of Mordana in Abbadon (see 110)" and a list of all the enemies you fight, so I must've taken it somewhat seriously back in fifth grade or whatever it was. I did get a copy of the "uncensored" UK version recently, just for fun. I graphed the US version though, in case there are differences.
The story is a pretty straightforward haunted house tale, albeit with devil worshippers and a bit of gore. The illustrations by Tim Sell are cartoony enough to not make it too gross or scary for kids. I imagine Bernie Wrightson could've provided far more nightmare fuel. The potentially grossest bit for me was the idea of guys wearing dead goats heads. At one point you find a headless body of a dead goat or sheep (you can't tell), suggesting that the goats heads are real and that the cultists are doing some nontrivial taxidermy to wear another creature's skin, hair, and horns as a mask. Sounds pretty unpleasant, especially on hot days.
I liked the idea of the named rooms. The house is a bewildering maze of corridors and doors, but the names give a bit of personality and help with navigation. Just for fun, here are all 12 named rooms and their respective sections:
- Erasmus Room (5, 140)
- Diabolus Room (13)
- Apollyon Room (17)
- Mammon Room (123)
- Eblis Room (125)
- Asmodeus Room (154)
- Tuttivillus Room (155)
- Shaitan Room (200)
- Mephisto Room (298)
- Balthus Room (299), named for the main antagonist of The Citadel of Chaos
- Belial Room (312)
- Abbadon Room (335)
Graph-wise, this is the most nonlinear story yet. The only true bottleneck, apart from the beginning and end, is section 318, which occurs in the endgame. Every other part of the story occurs as one of several possible threads. I was able to split previous books into "episodes" between story-wide bottlenecks so you'd proceed smoothly from one episode to the next in sequence. Not so here. The episodes below describe what I consider to be the fastest path to victory, but I'm sure there are others that are arguably as fast.
There are 20 instant death sections. That's slightly more than Citadel's 18 and far fewer than Deathtrap Dungeon's 31. You aren't going to get killed after 10 sections on average though, because they tend to be clustered in certain parts of the story.
This book has mechanics that make for fun graphing. At one point you're given a tip about a secret passage, but you can use the tip only in certain situations by subtracting 10 from your section number at that point. On my first pass-through I had a couple orphaned sections that I only found parents for after coming across that tip. In another case you find a key with the number '27' stamped on it. Later, you're told to use the key by subtracting the stamped number from the current section.
In addition to the usual SKILL and STAMINA scores, you also have FEAR. At the outset, you roll 1d6 to determine the maximum FEAR you can handle. You start with a zero FEAR, but "scary" situations can add to it. If it reaches your max, you die. Some chill situations, like enjoying an alcoholic drink, can decrement your FEAR, just like in real life.
Episode 1: The Start (1) to the Entrance Hall Landing (350)
The main thing to accomplish here is to get into the house as quickly as possible, get the clue about talking to the "main in grey" in the basement, and encounter the HUNCHBACK.
From the beginning (1), simply use the door knocker like a sane person (357) as opposed to creeping around peering in windows. The butler, Franklins, will answer and lead you inside (8). Examine the paintings (304), in particular, the one of the elderly lady (250). She'll tell you to seek help from a man in a grey robe. The Earl of Drumer arrives (277) and offers you something to drink. Accept the brandy (394). This subtracts one FEAR point, but has no effect here since you haven't yet been afraid. You proceed to the dining room (309), and the description mentions its "rich red" wallpaper, which is important later. The white wine is always drugged in this story, so accept the red (395).
So far things are copacetic: You've had two free drinks and they're offering either duck or lamb for dinner. It doesn't matter which you pick; either way you ask him about his family (28), which gives him an opportunity for some exposition. Franklins interrupts, offering fruit, cheese, coffee, or still more brandy. Oddly, the book gives you a choice of three combinations of three of these, with zero clues about which is correct. Turns out you want to avoid the cheese. I'm not sure it's possible to drug cheese, but they apparently did, so take the fruit, coffee, and brandy (224). You're now up to three drinks in less than an hour, certainly over the legal limit and likely approaching your maximum ALCOHOL score, so they lead you to bed. You'll be staying in the Erasmus room (5), which was named for Alan Erasmus, cofounder of Factory Records.
You can try to leave (59), but they've locked the door. Pretend to go to sleep (63) until you hear a shuffling noise outside your door (158). Hide behind the door to surprise whoever it is (373). (This is a recurring tactic throughout the story.) It's the HUNCHBACK, so cold-cock him (399). If you get him down to 4 STAMINA (220) he'll beg for mercy and won't likely forget you -- an important point for later. You won't get much useful info out of him right now, so lock him in the room and start exploring. You find yourself on the landing above the entrance hall (350).

Episode 2: The Entrance Hall Landing (350) to the Top of the Main Staircase (193)
Your goals here are to get the clue about the Kris knife and the clue about "Mordana in Abbadon."
Turn to the right (332). You'll immediately encounter a friendly GHOST who drags you into a room (73) to tell you that the only way to defeat the Earl is to attack him with the Kris knife. Unfortunately, she's attacked by ghostly dogs before she can tell you where to find it. You're given the option to either combat the Earl and his evil house or simply escape, but escaping will involve missing key clues, so you decide to fight (257).
Proceed down the hall (287) to the door across from the Balthus Room (86). It opens to a narrow passageway with a window. Inspect the window (110) to find the message "Mordana in Abbadon" written in condensation. You're instructed to turn to section 88 if and when you decide to speak this phrase. Proceed to the top of the main staircase (193).
Episode 3: The Top of the Main Staircase (193) to the Entrance Hall (132)
The goal of this episode is to determine the meaning of the message you just received. We'll skip over vast tracts of inconsequential story to do so.
First, open the unmarked door (377) to the storeroom and examine its contents (83) to find some garlic, a liquid, and a meat knife that you can use as a weapon to give you a +3 SKILL boost. The liquid is poison, so avoid it and leave by the same door (233). Ignore the unmarked door and continue down the hall (374). Turn right, following the landing (272) past the Tuttivillus Room to the door to the Abbadon Room (175). Open the door and go in (335) to find an old woman sleeping.

Wake her up (139), despite the fact that she's (un)dead, and ask her for information about the house (170). You'll have to fight her GREAT DANES, which, unlike the dogs that pestered the GHOST, are real. Once you kill them, stay to inspect the room (19), then blackmail her by threatening to destroy her plants unless she dishes info. Ask her about secret rooms (321) and she'll ask you, "What is my name?" Her name is Mordana and she's in the Abbadon Room, so you respond with, "Mordana in Abbadon" (88). She tells you (295) there is a secret passage under the cellar stairs. She forgets the password, but someone named Shekou knows it. This is the point where you're told you'll be able to search for the secret passage by subtracting 10 from the section that describes the space under the stairs, should you be so lucky as to find it.

Leave the Abbadon Room (159) and go back downstairs to the entrance hall (132).
Episode 4: The Entrance Hall (132) to the Cellar Stairs (393)
You're in the Entrance Hall again and the front door is right there. You might be tempted to open it, but doing so will just result in 3 FEAR points when you see something unpleasant that blocks your way. In fact, you're only halfway to the story's end.
The goal here is to get the hip flask of brandy, find the HUNCHBACK, and get him loaded so he gives you the correct password to the passage under the cellar stairs. You also want to find the grey-robed man in the cellar, as the helpful GHOST suggested. He'll provide a crucial hint for the endgame.
Choose the door on the left (353) and enter the drawing room. Your buzz is fading, so help yourself to some more brandy (292) for +3 STAMINA, grab the hip flask, and fill it with one for the road. Examine the corner shelf (192) and grab the dagger. If you examine the fireplace (303) and read the letters (364), you'll get an idea that the cellar password might be "Pravemi," since the letter signed by Count Pravemi suggests the Baron change his password to something that reminds him of "the sound advice of a good friend." This is the sort of tenuous inference that would've been utterly lost on me as a kid, but it makes no difference since it's a false lead.

Hilariously, you learn that the Baron's previous password was "Goathead," which in context is right up there with "Password", "Admin", or "123456789" in terms of security. Count Pravemi might've done better to suggest two-factor authentication.
Examine the demon face on the mantelpiece (85). Doing so will reveal a secret button but will also summon two FIRE SPRITES from the fireplace. Rather than fight them, try "another approach" (145). Move slowly backward toward the window (64) and dump a potted plant on them to make then disappear. Press the secret button (392). It opens a false wall panel that serves only to lure you onto a Looney Tunes-style trap door, which you subsequently fall into (397).
You once again hear the approaching shuffles that herald the return of the HUNCHBACK and once again are given the option of hiding behind the door to surprise him. Instead, search the room for a weapon (50) and you'll find a tree branch that's conveniently the size and shape of a baseball bat, good enough for +3 SKILL. As tempting as it might be to tee off on his head, hide it behind your back and stand meekly in the corner (263). When he comes in, greet him like the old pal he is (367) and follow him out of the room. Since we've met him before, jog his memory of you (230 > 198). He'll tell you his name is Shekou (bingo!). Critically, whether he gives you the real password or a false one depends on whether you share your brandy.

Offer to share (93) and he'll do two shots right out of the cap. He doesn't give you the password but hints that it's "like the name of the house, but mixed up." It was a significant challenge as a pre-teen kid in the '80s to come up with spooky anagrams for "Drumer."

Rather than follow his advice and take the corridor, stay and look around (166). Take the door on the right-hand wall (209) that leads to the dungeon.

There are three people locked in the cell. Unfortunately, there is nothing you can do for any of them. Fortunately, one is the grey-robed man you've heard so much about. Speak to him (363) and he'll reiterate that the master can only be killed with the Kris knife, but only if it's done in a red room, like the dining room. The dining room is normally locked, but you can find its key "hidden behind the mirror when ceremonies are taking place." He says he and his fellow prisoners will all be dead before the night's out, strongly implying that just such a ceremony will soon take place. Hmm.
Leave immediately (91) and ignore the next door since it leads to the torture chamber. Instead, proceed down the hall to the stairs (393).
Episode 5: The Cellar Stairs (393) to the End (400)
In case you've lost track, you're still in the cellar. Remember falling down the Looney Tunes trapdoor? Now you find yourself at the foot of the stairs leading to the main floor but, whoops, you're attacked by BATS and suffer one FEAR point since tiny winged mammals are so frightening. The idea of cellar stairs rings a bell, so you decide to seek shelter under them (320).

You're given the option to hunt around for a secret door and are told that some of the bricks look funny, but you aren't given an explicit option to do more. This is where you must remember your instructions from Episode 2: Search for a secret passage under the stairs by subtracting 10 from your current section number. My trusty calculator tells me that's section 310, so off you go. It redundantly asks you if you want to search for secret doors. Yes. Yes, you do.
You find a secret door, surprisingly enough, and are asked (276) if you want to try a password or search for a catch. You know the password, so choose that (237). You're asked to select from "Pravemi," "Goathead," "Murder," or "Kris." Interestingly, it first appears as though the same thing happens in each case: The door opens to a small room with a box on a table. In fact, they are four identical rooms, but you can only escape the "Murder" room (174): The others lead into the first of several narrative dead ends that stagger on a while before inevitably resulting in death.

So say "Murder" and the door to the correct room opens. Enter (48) and you'll find the Kris knife in the box. Oddly, if you continue searching you'll eventually find a door to one of the identical rooms, and entering that will once again result in your death. That's some fiendish plotting on Steve Jackson's part. Otherwise, with the Kris knife in your pocket, you awkwardly climb the cellar stairs (293).
Try the door to your right (260), but it'll be locked. Continue down the hall and enter the next room on the right (113), which turns out to be a reception room with a large mirror and a table. Hmm, didn't someone say the key to the dining room was kept behind a mirror? Despite it freakily not casting a reflection of you (are you a vampire?), you touch it and find your hand passes through. Investigate the room some more (324). You check out the table and find a hidden compartment with a box. But, oops, someone's coming! Grab the box and dive through the mirror (147 > 3). Inside the box is a golden key.

Behind the mirror, you find yourself in a small chamber (160). Use the golden key to unlock the right-hand door (294 > 10). It leads to a dusty room where someone recently hid a cast-iron key behind a stone in the wall. This is the key stamped with '27'.

There's nothing more to gain behind the mirror, so step back through it (349 > 131). Follow the hallway around to the next T-junction (58). You're asked to take the left or right door. The right door leads to the kitchen, which is yet another cul de sac of inevitable death, so take the left (323). You'll need the cast-iron key to open it, which you do by subtracting the number on the key from this section number. Microsoft Excel says the result is 296, so off you go.

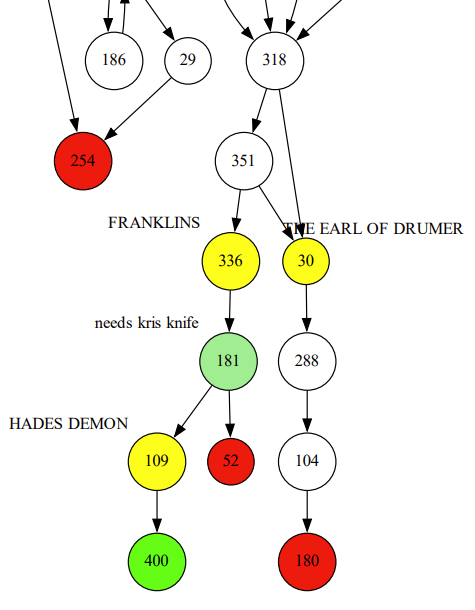
You've reached the endgame: You just unlocked the red dining room and you have the Kris knife. Now all you need is to summon the Earl and stick him. Fortunately, there's a bell pull for the butler. Give it a yank (318). Both the Earl and Franklins arrive and you give them a stern talking-to. You all assume battle positions and you're given the option to attack one or the other.
You must attack Franklins first (336). In a dramatic and shocking plot twist, the butler did it. The Earl is just a figurehead, and attacking him will just give Franklins the opening he needs to kill you. The first blow you land causes Franklins to transform into his true form: A HELL DEMON (or in the United States, a HADES DEMON).
I'm sure the illustration for section 181 directly inspired Jeff Easley's awesome cover to Manual of the Planes in 1987:


Regardless, the DEMON lays another 3 FEAR points on you. If you're still alive, you'll have to fight this thing with its math-defying SKILL 14 STAMINA 12. SKILL, being set with a 2d6 roll, normally can't exceed 12; however, in this case you get +6 SKILL for having the Kris knife and you've picked up a few other SKILL power ups along the way, like daggers and a big-ass tree branch, so in theory it could be a fair fight.
If you defeat the DEMON (400), you don't actually kill it, but you do feel sorry for it before candles ignite the room and set the whole place ablaze. Evidently, the Earl skedaddled during the ruckus, not even staying to bash you over the head with a folding chair, tag-team style, because he's nowhere to be found. You run to a safe spot outside within viewing distance, possibly with popcorn, to watch the place burn down. Congrats, you've won.
Final Thoughts
Like Citadel, this book focuses more on plot coupons than combat. There are only a few necessary fights and not all of them are to the death. That said, the FEAR score is a considerable obstacle to winning. Plenty of things that aren't really scary tend to bump up the score bit by bit, eventually scaring you to death. Also, the house is an absolute maze. It's not possible to navigate it with any confidence without mapping your progress in some way or just building a complete graph as I did.
As I mentioned before, the kitchen is one of several long bits of story that offer choices, fights, and items only to amount to nothing since, whatever you do, you inevitably die. These strike me as lazy storytelling at best, or the author being a sadistic bastard at worst. How do you rage quit a book? Throw it across the room? Toss it in the fire?
There are actually quite a few Satanic tropes in this book: A pentacle (151), direct references to Satan (the room names, albeit in different traditions), and not least, an actual human sacrifice (314) which describes the killers as "smearing the unfortunate victim's blood all over themselves." Scooby Doo this ain't. Dell may have changed the U.S. title from Hell to Hades but all that stuff is still in there. Regardless, this book still struck me as cartoony as a kid, maybe because of the goofy illustrations.
A book that did disturb me as a kid was Invasion of the Black Slime and Other Tales of Horror. It was a Which Way book, not a gamebook, but one of many cheap Choose Your Own Adventure knock-offs. It read like a slasher flick, with far more suspense and much more realistic illustrations, dabbling in what would be later termed "body horror."
I never asked my mom for another Which Way book.
Anyway, with all the Satan and cult stuff and the three our four alcoholic drinks the main character enjoys, I have to hand it to Steve Jackson and Dell for slipping some adult-ish content into House of Hell amidst the great Satanic Panic of the 1980s. This and a good Dead Kennedys album were probably enough to put any budding Gen X'er on a path of lifelong moral turpitude.
Speaking of a 'censored' version, did you ever see the pic that was removed for being too graphic? Nekkid lady about to be sacrificed.
ReplyDeleteYes, both of my copies have it. It's one of the better-drawn pics in the book.
ReplyDelete"If you defeat the DEMON (400), you don't actually kill it, but you do feel sorry for it before candles ignite the room and set the whole place ablaze. Evidently, the Earl skedaddled during the ruckus, not even staying to bash you over the head with a folding chair, tag-team style, because he's nowhere to be found."
ReplyDeleteNo? Look again. You kill the demon and it knocks over the candles as it collapses. You feel sorry for the Earl as he collapses sobbing over its body.
I played through this book today. I have the original release from the 80's UK version. I came a cropper in the great dane section. I took the route 144 - 71-334 - 278. This is where my version differed to your map. I wasn't playing through using it but realised it when looking at it afterwards. In my version the only options available from 278 were either 60 - 7 and death or 342 which takes you back to the head of the Great Dane track. Which in my copy ultimately results in death at 7 despite fighting and choices. In your map you have the ability to go to 324 (is this a transcription error) in my book this option is an unrelated section of text. The only way to avoid this defeat would seem to be to avoid taking the track and ignore any options taking you to paragraph 216, 23 steps previously!
ReplyDelete